
How to Make Snowshoes from Duct Tape
Snowshoes are an essential resource to have when traversing large areas that are covered in deep snow. Their larger surface area helps to distribute weight and enable wearers to walk on top of the snow instead of making deep impressions. This helps to conserve energy and strain on the body as well as reducing the amount of time that it takes to get from point A to B.
You can make a pair from duct tape and a couple of long and flexible sticks. Learning this trick can help you to improvise if you find yourself stuck in a situation without having proper snowshoes on hand. Below is a basic outline that will give you a general idea of how to fashion an improvised pair.
Choosing the Right Sticks
Weight and terrain are important things to consider when deciding on the size of snowshoes. On one hand, heavier people will need larger snowshoes in order for them to be as efficient as possible. On the other hand, smaller snowshoes are more stable and are ideal for walking through uneven terrain or heavy, wet snow.
As a general rule of thumb, people who weigh between 160-180 lbs should have snowshoes that are around 26 inches long. People who are 180-200 lbs should use shoes that are 30 inches in length. Bigger people, from say 200 to 250 lbs will benefit most from shoes that are between 33-36 inches long. Of course this will differ from person to person, but this will give you a general idea of the length of sticks that you will need. Remember to also include the weight of your backpack or gear that you are carrying in your estimates.
You want sticks that can bend into a teardrop shape without breaking them. However, they also need to be rigid enough to provide the structural support that is necessary to keep the snowshoes together. Consider getting branches that are about ½ to ¾ inches in diameter and about six to eight feet long. Remember that the length of the shoe needs to be measured from end to end. Choose sticks that will give you more than you need, and you can cut them accordingly.
You will also need four to six smaller sticks that you can place across the center of the snowshoe to support your feet. You can add more or less depending on your needs, but make sure that you have a few feet of branch that can be used for this important component.
Putting Things Together
You will need a lot of duct tape in order to make a strong and dependable snowshoe. You can also use twine, string, cordage or fibrous debris from the ground around you as an alternative. However, duct tape is strong and relatively soft, which makes it the material of choice for this project.
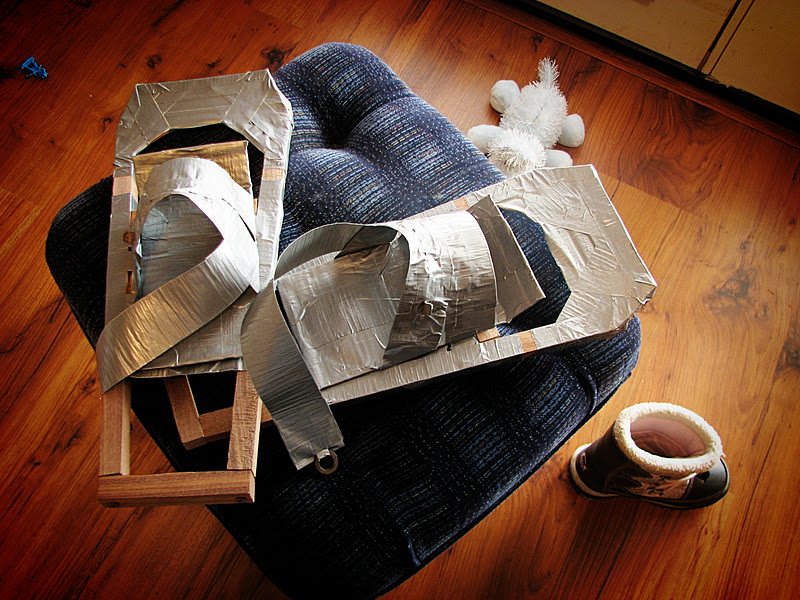
The first step is to bend the stick so that the two ends overlap at the bottom of the teardrop. Check the length and trim the ends as necessary. Secure the ends with a couple of strips of duct tape. The next step is to take a few strips of tape and place them from one side of the shoe to the other so they are perpendicular to the top and bottom. Place them a couple of inches apart. This will help to secure the frame in place and make it easier to finish the project.
Tape the structural support branches evenly beneath where you plan on placing your feet and secure them in place. Then, You want to cover the toe area of each shoe with duct tape while also adding layers so it will extend a few inches into the space of the top of the shoe. This will help to keep snow and other debris out and maximize the gliding effect that the shoes will produce while walking.
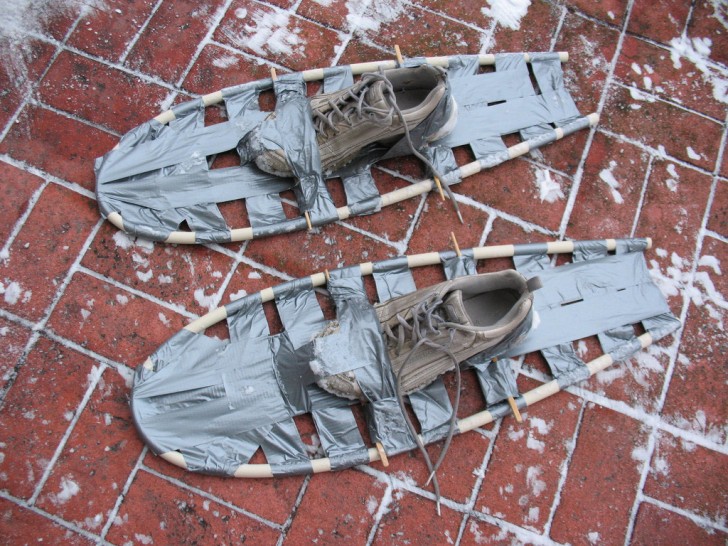
The next step is to fill in gaps between the support sticks and the strips that you’ve previously fashioned. You want about ¼ to ½ inches of space between the strips and sticks. This will maximize the effectiveness of the shoe, increase its rigidity, improve traction and provide optimal support for your feet. Never make shoes that are completely covered in tape, otherwise the snow that is being displaced while you walk won’t have anywhere to go. This will cause you to lose traction.
The final step is to add some tape to make the foot holder. You want it to resemble the leather strips on good sandals. Make a pad for your toes, a few straps that will go over your feet and then one that wraps around your ankle. Take a few strips to make each of these elements so they will be strong, soft and provide maximum grip for your feet.
Keep in mind that the size of the boot or shoe holder needs to be a little bit larger than your footwear, but tight enough to hold your feet in place as best as possible. You can always make straps smaller or bigger as needed, but be prepared to make at least a couple of modifications as you work out the optimal fit.
This is just a rough sketch of how to make your own snowshoes in an emergency. Give it some thought and improvise as necessary. You will be amazed at how fast and far you can travel by wearing snowshoes. You will also be able to minimize stress and energy depletion that you would otherwise experience while trudging through the snow without them.