
Building a Tepee Shelter the Easy Way
You don’t need canvas, tarp or expertise to build a sturdy makeshift tepee. All it takes is a little bit of
practice, some wood, cordage and some natural material that’s in the area. This time-honored and
practical shelter can be constructed in about an hour (less if you don’t have to hunt for resources), and it
can be scaled to meet your needs. Take a look at the instructions below and discover how you can
throw one together in just a few steps.
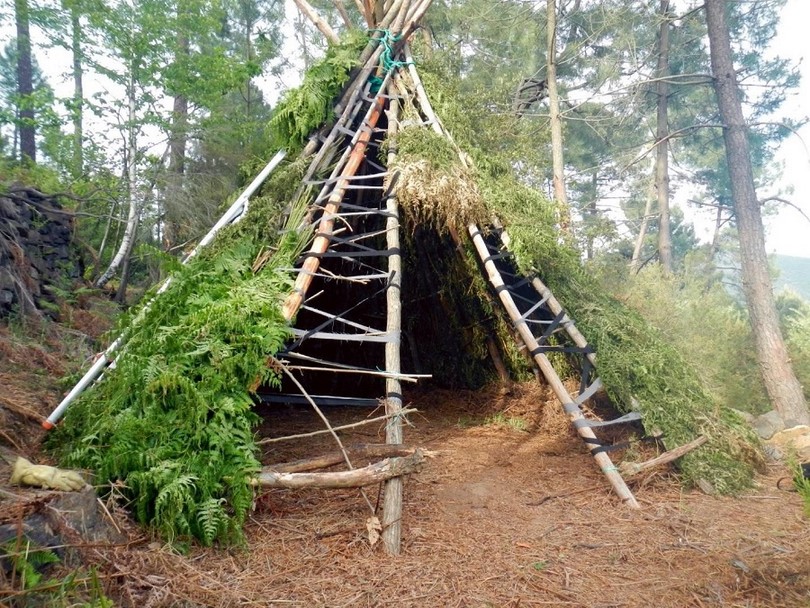
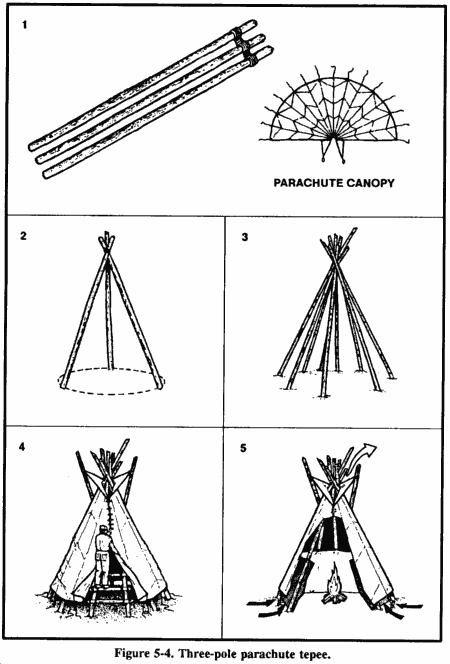
The first thing you need is wood. Ideally, you want about 10-12 branches that are about six feet long
and two to three inches in diameter. To assemble the frame, take three branches and stand them up,
leaning each one into the other. Tie off the tops about two inches from the ends with some cordage by
looping the rope around each branch and then wrapping them all together. Add three more branches
between the first ones, lash and repeat once more.
You can continue to add branches to the frame until it is completely full, or you can leave gaps between
the wood if you have material that can act as a skin. Remember that you will need a door way, so leave
a gap wide enough for you to be able to enter and exit. If you do have canvas or tarp, then you can
simply wrap them around the frame until the ends meet at the opening. If you don’t have material, you
can gather your own by using brush, moss or small branches with pine needles or other sturdy foliage.
Place the ends of the small branches underneath the cordage you used at the top of the tepee, layering
them until there are no gaps. Add some cordage about 12-18 inches below the top lashing and place
more branches under that rope as well. Repeat the process until the tepee is completely covered with
the branches. You can also use patches of moss, bark, grass or any other type of material that can be
held in place.
The next step is to decide whether or not you want to take some mud or pine resin and seal the gaps
between the wood around the frame. This will depend on whether or not you are using the tepee as a
more permanent shelter as well as if you expect rain to fall and leak into the inside. Both options
should be good enough to seal major gaps and minimize leaking. It will also promote greater insulation
and help to retain heat.

That’s about it in terms of the fundamentals, and all you really need to decide is where to place the
tepee as well as its diameter. Keep in mind that the length of branches that you use will correlate with
the diameter of the interior. Longer branches will give you a space that is higher and wider than shorter
ones. However, if you build large tepees, it will be really beneficial if you have someone there to help
you get the basic frame set up. Smaller tepees are easy for one person to construct.
Use your resourcefulness and wilderness skills to modify and expand on this basic method in order to
create the right shelter for your needs. Remember that the material available will depend on your
particular location, so you will almost certainly need to make some improvisations as you go.
However, once you get the hang of it, you should be able to build one in less than an hour and give
yourself access to a sturdy and effective shelter without using a lot of resources or energy in the
process.